Friday, April 12, 2013

Baby Shower Gifts

By Liz

 
I have grown to love making blankets so I made this blanket for my friend's baby shower.  She is having a little girl in the next month or so.  I grew up with some of these materials and just had to make a blanket with them.  I also made the burp cloths; you can never have too many of those.
 
 
I decided to have a little fun with the cards.  Because I don't have a cutting machine and had to make up the patterns and find the misc items, it took me almost as long to do the cards as it did the blanket.  But I think they turned out really cute.  I find the ideas for these cards on Pinterest (click here for the girl one and here for the boy one).


Enjoy and happy sewing!

Thursday, March 28, 2013

Sheets made into Dresses and Skirts

By Amy

I have really been sewing non stop since the beginning of the year and I have been loving it so much. I feel I have improved so much and I learn a something new with every project I complete. I am so happy so show you what I have done with Thrift store bed sheets.


This one was actually a duvet that why I have to different designs that match really great together. The ties that you see can be tied in the front or the back to give you a different look.


I didn't make the shirt but I picked it up at the local DI which I will eventually make it into a short sleeved shirt for the summer.


I enjoyed this check yellow pattern and found a simple skirt pattern from morning by morning productions she has great tutorial to go along with the pattern.

 
I love how simple and fun the skirt is I just see myself running through a field of flowers with the Sunshine at my back.

 
I didn't make the shirt but I need to take it in on the side and make it a short sleeve shirt I might add in some ruffles for fun.


I found this number and knew I had to make something I could wear out of it. I found another simple pattern using pinterest that also has a great tutorial on how to make the dress. blog for better sewing I enjoyed the fabric that she used maybe I could find a sheet like that and make one.
 
 
This skirt gives me a look of a 70s house wife waiting for her husband to come home to a sparkly clean house and a hot dinner.

 
I love this dress except for the fact that it snags on most thing. But its shiny! It a simple pattern I purchased from running-w-scissors a while ago. I love how the pattern fits me and I will be making more of these to wear throughout the summer. This one is just for special occasions like dates with my husband.


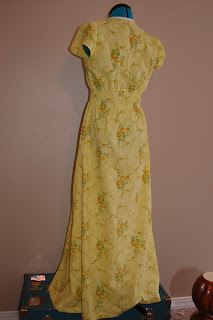
This is the same pattern as above and I love wearing this everywhere. I feel like I'm wearing my grandmas sheets but I totally okay with that. This dress also comes with pockets which is perfect for a mom with kids.


The length on the dress is my favorite, I will for sure make a few of these as well.

 
This is the waist that is sheered with elastic thread to make it super comfy!
 
That all for now but I have so many projects in my to do list that I will be excited to post them all next month.
 
Have Fun Crafting!


Bags for Grandma

By Amy

I made a few bags for my sister and my mom they are just the right size to
hold what my sisters and I need for everyday use. My mom went to
visit my grandma and she asked if I could make her some as well. She
sent me down a load of way cute fabric and I have been matching,
cutting, ironing, pinning and sewing ever since.
 
 
These are just 6 of the 10 that I have made for her I will get pictures of the
others ones up soon. I also have a stack of 13 or so more that I need to
be start the sewing process on. I been having so much fun putting all
the colors and designs together.


The one thing that is missing is a large button to close the top of the bag but I have enlisted someone else to sew all the buttons on.

 
I didn't want to the inside of the bag to boring so I been putting fun light colored fabric inside. Why should everyone else have the fun when you can have a secret color that just for you and the items in your bag.

 
I have enjoyed making these bag and since they are for my Grandma it make me so happy to give back to her for all the items she has painted and sewn for me throughout the years. Plus my payment for making all the bags is she sends me fabric. I really should make a T-shirt saying Will Sew for Fabric. I would sew anything for my Grandma.
 
Have Fun Crafting!

Duffle Bags for Everything

By Amy,

My problem I had before I made these was that I couldn't fit everything I needed for each kid into one bag each. I found this Old pattern in my mom's stuff and stole it from her knowing it would be perfect for traveling.
 
 
I have enjoyed stuffing everything I need for my kids into these bags. I also used Iron on lettering for there names since I made the bags the same I wanted to be able to know who's bag is who's.
 
 
I used a contrasting yellow zipper to have some color pop on the bag. I also tied on ribbon to the zipper so its easier to open.

 
The bags are not square they are smaller at the top then the bottom but not by much it help to increase the bag size. I used a blue checkers curtain I bought at the thrift store this fabric was also used on a ottoman I redid a few months ago.

 
These are the bags I made for myself I wasn't sure about the fabric when I was cutting it out but as soon as I started sewing it made me so happy. I have enjoyed the color and the stripped fabric in a bag form.

 
I made a smaller bag for my bathroom supplies to take along shampoo, straighter & blow dryer. I upcycle a silver zipper for the smaller bag.

 
This is the amazing and simple bag pattern that I had to make these bags.
 
Have fun Crafting!


Wednesday, March 27, 2013

Easter Bag

By Liz
 
I got a late start on this considering Easter is on Sunday but I finished it in about an hour so I guess I got lucky this time.  This was so simple and good practice for bags.  I followed the tutorial I found on Pinterest.  For the tutorial go here
 
I made this Easter basket for my son.  It's his first "interactive" Easter and I thought it would be fun to make his basket.  Take a look.  I think it turned out rather good.
 
 
It should be flexible enough to store but strong enough to last for a while.  I'm excited to give it to him.  Happy sewing and have a good Easter!


Friday, March 22, 2013

Sneak Peak

By Amy


I decided that my kitchen table was boring and that my whole
kitchen needed some color. This is my idea!
 
 
The first thing I did was go into my garage and found a can of paprika red paint
that I bought last summer at a yard sale for 2 dollars.


I washed all the chairs from my children's messing eating.


Found the comic books (with my husbands help) to add that extra fun to
our dining room.


This is one chair done and 4 more to go and the table as well. I'm super
excited how its turning out, my dining room is already
feeling more fun!
 
Have Fun Crafting!


Wednesday, March 20, 2013

Upcycled TV Stand

By Liz

So my husband decided to build a TV stand for us since our son was driving us crazy playing with the TV on the small stand we had it on.  I didn't want to throw away the stand so I converted it into a small couch for my son. 
 
I started by taking off the top so it was a seat then I took the measurements and got to work. 
 
What You'll Need if you want to do this too:
-foam or padding
-material
-zippers
-old TV stand or furniture to add padding to
 
My sister-in-law had some leftover foam that I used but I've seen projects similar to this done with pillows and even stuffing.  Whatever you want to use should work.
 
Since I took the top off, it left some of the edges rough and sharp so I sanded them down. 
 
 
I cut the material for the cushion covers adding an inch to the measures to make sure I had enough for seam allowance and make sure I could still get the foam inside the cover.
 

 When you sew the cushion covers, you start by sewing the zipper on one side (close to the length of the cushion so you can get the foam inside when it's all put together) then sew all the sides together.  Then sew the sides to one of your top covers.  When you sew the sides to the top cover, make sure it is inside out so you can hide all the seams when you finish. 
 
The corners were difficult for me to figure out so my mother-in-law gave me some tips.  To sew the corners, you want to sew to the corner, lift the foot of your machine up, flip the corner seam to the side you just sewed, put your foot of the machine down and continue sewing.  I did back stitching at every corner to make sure they will last through kids.
 
Sew the other top cover piece to what you've already sewn the same way as before.  Flip inside out (iron if desired) and make sure all the corners are crisp and defined.


I found it easiest to sew this project when I pinned it, especially for those corners. 
 
 
This is how it turned out.  I sewed 4 cushion covers because that was the easiest way for my mind to do.  I like having the option to take the covers off and wash them since my son always seems to have messy hands. 
 
Happy sewing!


First Upholstering

 By Liz
 
Let me just say that reupholstering was no where near as difficult as I thought! I finally got up the guts to try it out.  I found this footstool at a local thrift store as well as the material I used to reupholster it. 
 
What you'll need:
-a piece of furniture to reupholster
-padding of some kind
-material
-staple gun and staples
-pins
-something to pry out previous nails/staples
 
This was what I started out with.  It was stained and not very pretty (obviously). 
 
 
As you take apart the furniture  you will want to take pictures.  Take as many as you need to make sure you can put it back together.  Also, take note of how the materials are layered and put together.  I started on the bottom and worked my way up.  The piping wasn't nearly as hard as I thought it would be.  When I was putting the new product back together (from the top down) I used pins to hold the material where I wanted so that it didn't move when I stapled it.


Tah-dah!  That was it.  It took me about half a day to complete this footstool but now that I have the idea of reupholstering down I think the next one will go much faster.  

Thursday, February 21, 2013

Green Plaid Dress

 
This is just a little different look then the purple ruffle shirt I did a couple of weeks ago. I got the idea from mommy by day crafter by night I love how hers turned out with the Apples but I just used what I had at home.


The shirt material I found at the local thrift store I had enough to do this shirt. I made the pattern from my own measurements. I also added some green buttons to match the plaid green skirt.
 
I made the skirt by using my own measurements and adding the 3 inch black elastic that I also bought at the thrift store in town. I believe the whole outfit cost me under 5 dollars to make....which makes me love the outfit more.

 
Have Fun Crafting!

Tuesday, February 12, 2013

V-Day Oufit


This outfit was easy to make but I had a few issues on making it look just right for my body type. I had to undo and resew a number of different seams which means I am super happy I have it done.


I made this shirt using an idea I found on Pinterest from lilblueboo She did a much better job then I did. I didn't make the shirt wide enough to begin with, so you see I had to add a 2 inch strip under the arm on both side to give me the baggie look. Everything else went really well but I wish I would have made a larger band for the bottom of the shirt.


This skirt is actually a black pair of slacks I had lying around that I didn't wear very much. I got this fantastic idea from this picture I pinned on Pinterest.

 
I figured I could do this and if it didn't work I would be out a pair of pants I didn't really like. Now I want to make some more skirts like this because they are super easy and I can complete one in under an hour. I really like how it turned out and of course it is so comfortable.
 
Have Fun Crafting!